Thursday, October 9, 2014

xo David Lebovitz

I LOVE LOVE LOVE David Lebovitz. I do. We share stomping grounds/passions. First, we are both from the Bay. He cooked at Chez, I was at Oliveto. Then he took off to Paris, as did I. Difference is, he never came back, I did. Oi. What was I thinking? There is still hope, however. If I am not mistaken, he left for Paris when he was 47 (?) which still gives me some time to wrap up a few things before I hit the road. For now, I will live vicariously through him. Which is a pleasure, not only because he writes about my favorite city, but he writes about it so well.


I am actually reading his current cookbook as a novel (thank you Sandra C., for giving it to me for my birthday!). It's not just a great book of recipes and tales, but David has a way of really connecting with his readers. He's humorously self-deprecating, and he makes us feel like we should be linking arms and laughing our way along the Seine, saying: 'Ces drôles Française!' (et, oui, je parle Français. C'est vrais, hier soir je rêvais en Français!).

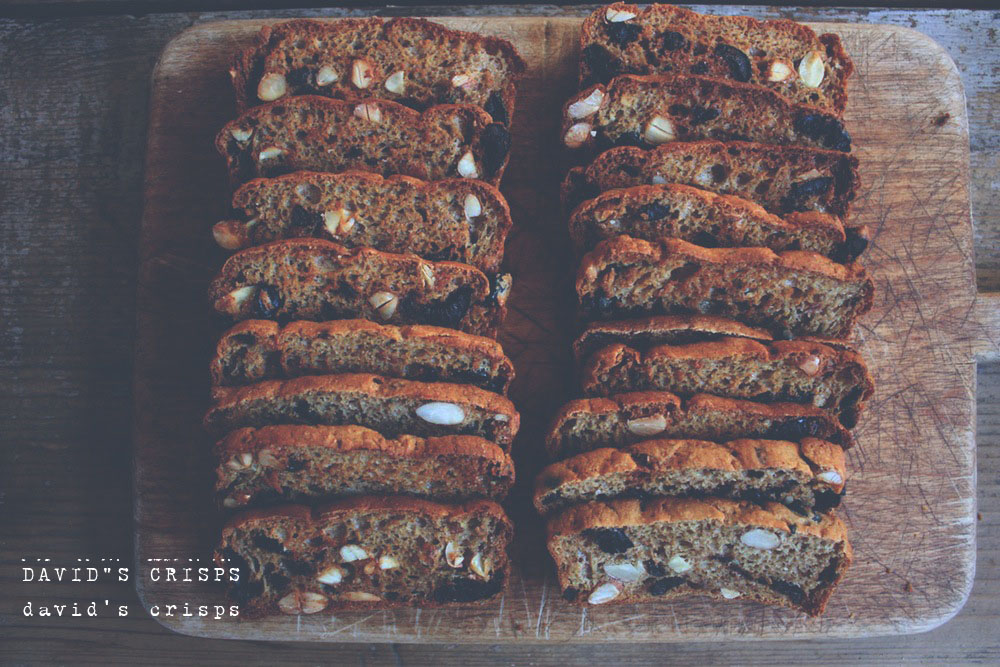
Speaking of making merry with friends, I had this little dinner party last night, having bookmarked several pages from David's book the week prior. I could not decide which salad to make, such a complication! So I did my own thing. I did, however, have the faculty to decide on these lovely-looking black olive/almond crisps, and man, oh, man! did they came out smashingly.

David Lebovitz's Salted Olive Crisps

So much, in fact, that I thought up a whole nother version of them. My version has raisins, flax seeds and hazelnuts, and I ground my own spelt (David uses whole wheat). Divine, these. I served both varieties with this lovely roasted red pepper feta thing que je fais pour mes petites soirées, and they were a hit. I think that these are going to be my go-to crisps for the holiday season. They whip up in a hot second (no sourdough here, just a heads up; the loaf calls for baking soda) with zero fuss, and you are likely to have all of the ingredients for both versions loitering about.

Thank you D.L., for continuing to bring me Paris, making me proud to be a Bay Area girl, and for sharing many lovely things to carry me through the upcoming season. Et oui alors, onward à la recette.

xo


.
I am starting with the recipe for David's crisps, but I encourage you to get your own copy of his book from Amazon, because it really is incredible. If you have not already, you should also visit his blog. The only adaptation I made was that I added some lemon zest to the batter, and I used fresh thyme instead of dried, as David suggests. My version, a sweet one, is just below.

70g all-purpose flour (I used Giusto's Artisan flour)
70g whole wheat flour (I used Community Grains hard red winter wheat)
1 TB granulated sugar (I used Trader Joe's organic cane sugar)
1 tsp fresh thyme
Zest of one lemon
1/2 tsp kosher salt (I used Diamond)
1/2 tsp baking soda
1/2 tsp freshly ground black pepper (I employed a coarsish grind)
250 ml buttermilk
45g untoasted almonds (they will toast up once you slice the loaf into crackers and give it a second bake)
60g coarsely chopped and pitted black olives (I used oil cured)

Preheat the ov to 350. Slick a 9" loaf pan with olive oil, and line it with parchment for easy removal of the loaf after baking.

In a bowl, mix together the flour, salt, soda, pepper, zest and herbs, then stir the buttermilk into this, now the almonds and olives. Using a spatula, get the batter into the awaiting pan and bake till a cake tester shoved into the center of the thing comes out clean. Mine took longer than the 30 minutes that David suggests. It will be a little golden, but don't let it get too dark. You are going to slice and bake the crisps in a moment.


Remove the loaf from the oven and cool in the pan for about 5 minutes. Unearth the loaf from the pan and cool on a wire rack for about 20 minutes.

Decrease the ov to 325. Line a baking sheet with silpat or parchment. Set aside.

After the loaf has cooled some, slice it into 1/4-inch slices and lay in a single layer over the baking sheet. Bake the slices, watching them carefully, until they turn golden brown. You will have to flip the slices (the bottoms brown quicker than the tops) and rotate the pan during the bake for even browning.


Remove from the ov and cool before serving. Well, this is what David says. We ate some warm, some cool. You know. Evidently they can be stored for a week in an airtight container, but we had no need for storage. These crisps were gone in a flash.


Spelt Crisps w/Hazelnuts, Flax, and Sultanas

(adapted from David Lebovitz's Salted Olive Crisps from his book My Paris Kitchen)

70g all-purpose flour (I used Giusto's Artisan flour)
70g freshly milled spelt flour
1 TB granulated sugar (I used Trader Joe's organic cane sugar)
Zest of one lemon
1/2 tsp kosher salt (I used Diamond)
1/2 tsp baking soda
250 ml buttermilk
45g untoasted hazelnuts (they will toast up once you slice the loaf into crackers and give it a second bake)
30g flax seeds
60g sultanas that have been soaked in hot water for about 30 minutes, then squeezed dry


Follow the directions as above, mixing the dry ingredients, then stirring in the buttermilk, and finally, folding in the nuts, flax and raisins. I served these crackers with a lovely roasted red bell pepper feta dip.

Red Pepper Feta Dip

Thank you David for the continued inspiration. You are a gem and a doll and we all love you so!

xo

To the staff of life!

Wednesday, September 10, 2014

Bird Seed Bread

Growing up, my family cared for a menagerie of odd animals - rodents, snakes, newts, anoles, aggressive bullfrogs - but we also had dogs and, my favorite, parakeets. My mother would teach them to curse when she cleaned out the cage. There is nothing quite like entering a room lain with a carpet of swear words and whistles.

When it came to feeding time, this was my business. I always wanted to feed them three-times what my mother would allow. It just seemed like such a teensy amount. I would myself nibble on the shiny little beads of seed, the little birds cooing 'F-you, F-you' in my ear. Of course, the little yellow pellets were the best. Millet. Crunchy and mealy and strange.


Millet is one of those things that people approach with apprehension. It is a seed, yeah, not a grain. In America it was only ever used as bird fodder, though we have all read in our Encyclopedias that it is an important staple in Africa. It would take the hippies decades to sing of its virtues before successfully raising it from exoticism and ignobility alike.

I've been eating millet for as long as the hippies have been extolling it. For me, it's the same as reaching for brown rice or the more highly-esteemed quinoa. Here's a tidbit: millet is said to reduce cellulite (most important), and it is also proven to reduce the risk of heart attack, migraines and the severity of asthma. This ought to get you all cracking then on this loaf of bread whether for health or vanity.


This loaf was an experiment. I had some millet, I wanted to use it up, and this is a bread that I have neither read about nor experimented with. Here's some helpful advice: I actually use millet to clean out the Komo between millings because it's cheap. After milling your flours, run a cup or two of millet through the machine on a coarsish grind and it will gather up the collecting flour and dash it out of the machine. This is especially helpful if you are making durum rimacinato regularly, since the very fine flour has a tendency to cake up in there and shoot out in nasty little sheets the next time you move to make flour.


I have to say. Wow. This bread turned out amazingly. I first toasted up a measure of millet, ground some of it up into flour (52g) and added the whole toasted and soaked seeds to the dough (75g). The resulting loaf turned out nutty and toasty and delicious. The little seeds tenderized during baking, so, no crunchy little bits here. I also added some freshly milled Bob's Red Mill hard white wheat flour to the dough (107g), and the remainder of the flour was, of course, my beloved Giusto's Artisan. The shattery crust was beautifully festooned with little golden beads, making the loaf not only heavenly to taste, but glorious to behold.

It's impossible to keep from eating slice upon slice of this bread. So the next time someone accuses you of eating like a bird, you might think of this loaf, smile knowingly and say, 'Yes, yes I do.'

I give you this week's bird seed bread.


This formula makes one loaf

MAKE YOUR LEVAIN

3 or 4 days before you make your levain, kick it into high-gear by feeding it 3-4x a day. On levain day, you will need:

11g 100% hydration dark rye starter (mine is made with BRM home-milled dark rye flour)
75g freshly milled BRM hard white winter wheat flour
75g h2o

Mix the levain ingredients together until you reach a paste. Mine fermented for about 8 hours.

DOUGH DAY

You will need:

345g h2o
341g Giusto's Artisan flour
107g Bob's Red Mill hard white wheat
52g toasted* millet flour*
75g toasted* millet, soaked overnight (on the counter is fine) and drained well
13g kosher salt, I used Diamond
All of the levain

*To toast millet, just pour the total amount of millet needed for your formula into a cast iron pan, and over high heat, toss the millet ceaselessly in the hot pan until it turns golden brown. For this formula, toast the total amount of millet needed, then grind 52g of it into flour and soak 75g overnight on the counter. I just poured this amount into a glass measure, filled it with water and let it be.

Back to the formula.

When your levain is properly fermented, mix together the levain, the flours, the soaked and drained millet and the h2o until you reach a shaggy mass. Autolyse for 1 hour.

After the autolyse, the dough should have expanded a bit. Squish the salt into the dough until it's fully incorporated work the dough into a smooth mass. Now it's time for the 4-hour bulk fermentation.

Every half hour, perform a series of turns, taking care not to deflate the dough as you near the end of bulk. You will likely stop your turns somewhere around 2 hours into the bulk. For the remaining bulk, leave it untouched. I did two hours of turns, left it untouched at room temp for an hour, then popped it in the fridge for the final hour because it has been really warm here.


When bulk fermentation is accomplished, turn the dough out onto a workspace dusted with brown rice flour, and shape into a loose round. Let it rest. Mine rested for 10 minutes. 

After the bench, shape the dough into a taut boule. I am a huge fan of the 'Forkish fold', so, I shaped the boule and popped it into a bowl lined with linen that I have first dusted with brown rice flour (you may use a banneton), seam-side down.


The next day when you unearth the dough, the seam-side lands upward, and it is at these fissures that the steam is released, thus the dough will open erratically and beautifully.


Alternatively, you may shape your boule placing it seam-side up in the banneton or linen-lined bowl, then on bake day, you can unearth the dough and score as desired with a blade.

Pop in the fridge and ferment. Mine fermented for 19 hours.

BAKE DAY

Preheat the oven to 500 degrees with a dutch oven and baking stone inside.

Pull the dough of of the fridge. Pop a piece of parchment over the mouth of the bowl, then place a peel over this. Quickly invert the bowl so that the dough ends up sitting on the paper and the peel, seam-side up for the Forkish fold method, seam-side down if you plan to slash.

The 'Forkish fold', dough lands seam-side up

If you plan to slash, then do so in some divine manner first before getting the dough into the oven. For the Forkish fold, just slide the dough immediately into the shallow half of the hot dutchie. With both methods, after the dough has been slid into the pan, cover with the fat half of the dutchie, slide the contraption into the oven, and steam for 15 minutes at this temp, then turn the oven down to 475 and steam for another 15 minutes.

After the steam, remove the fat end of the dutchie, then stack the pan over its mouth to create a buffer between the hot stone and the bread. This will help keep the bottom of your bread from blackening.

Toggle the oven between 460 and 475 until the boule is baked to chestnut brown. Cool on a wire rack for at least an hour before slicing.


This post has been shared on Susan's Wild Yeast Blog.

To the staff of life!

Friday, September 5, 2014

Focaccia: A Continuation

Well, one new dough, two new ideas. But I'll get to that in a minute.

So, I have never been one of those people who nurture themselves when sick. I do the opposite of what I'm supposed to do. Instead of resting, I run around like crazy and do as much stuff as possible. It's like I'm thumbing my nose at being sick. And who has ever heard of getting sick in the middle of summer during a heatwave?

It all began Friday. The start of my weekend, right. I was grinding rye berries for my starter, and I spilled the bag. Of course the little silver berries scattered behind and beneath every conceivable piece of furniture (I have to grind my flour in my atelier because the walls are so thin in my apartment that the neighbors next door bang about if I grind in my kitchen, which shares a wall with their bedroom), so I began collecting the berries, moving furniture, sweeping under here and there, aghast at how much dust was taking up residence. Of course that prompted me to really start moving things about, getting nitty gritty about taking up all that dust. I started thinking about all of the cabinets and closets and clutter that needed to be dealt with too. May as well, I'm already married to this cleaning frenzy, and it's my birthday in 12 days, so I want my life to be spotless before I enter my new year. Well, all that led to so much deep cleaning that I filled a quarter of a dumpster, hauled a bunch of crap out to the curb, gave stuff away to a friend. All because of that damned bag of rye berries gone mad. Of course, all the while I am feeling ill, right, and the dust is not making things better. During this (three-day) stint of madness, having autoclaved every piece of furniture, scrubbed every cabinet raw. I also start a round of bread. Not one, but two different kinds. Right after the farmer's market, of course.


As you can see I'm still on this focaccia kick. I think it's because the onion focaccia from the last post was so pretty that my wheels have been spinning ever since. I also wanted to perfect the final fermentation time for our focaccia (10 hours). The onion focaccia eased the fennel image into my brain, and since I wanted a thinner loaf this time around, I decided to snip off a bit of the dough giving me another opportunity to fancy things up. Eggplant. Of course! It would fit perfectly into this little slip of dough, and they're so gorgeous when you roast them, I figured slices of the purple beauties would be fantastic on today's focaccia.


This time around I made parchment collars for them so they popped out of the pans beautifully. The flavor was fantastic. Totally mild with no acidity at all, which is what I aimed for. Good open and chewy crumb, crisp exterior. The whole thing rich with olive oil. Mm.

With all that said, on top of all of my cleaning, my minor illness, my marketing, my bread making and now this post, I am zonked and have to hit the sack to begin a new work week.

FENNEL & EGGPLANT FOCACCIA


LEVAIN DAY

Three days before you plan to make your levain, throw your starter into overdrive by feeding it three or four times each day. On the fourth day, build your levain by mixing up the following:

10g 100% hydration starter of your choice
75g h2o
75g freshly ground hard white wheat flour

Mix up the above. Ferment. Mine fermented for 8.5 hours.

DOUGH DAY

You will need:

All of the levain
50g freshly milled white wheat flour
50g freshly milled durum, milled to semolina
400g Giusto's Artisan flour
380g h2o
20g good olive oil, I used California Olive Ranch
12g salt

When the levain is at its peak, mix it with the flour and h2o until you reach a shaggy mass. Autolyse for 1 hour 45 minutes

After the autolyse, squish the salt and olive oil into the dough. Now it's time for your 3 hour, 15 minute bulk fermentation.

You will not perform turns through the entire bulk, instead, you will intuitively know when it is time to stop by the rate of the dough's expansion. I stopped my turns at 2 hours then popped the dough in the fridge for the remaining half our of bulk because it was really warm in L.A.

After the bulk fermentation, scrape the dough onto a worktable that you have smeared with good olive oil, gather it into a loose round and let it rest for about 10 minutes. If you are going to make a baby focaccia whack off about a quarter of the dough, gather and rest the same as the larger dough.

Meanwhile, with a very small amount of olive oil, oil the sides and bottom of a cake pan with a removable bottom (9" wide, measured on the inside x 3" deep); fit with a circle of parchment along the bottom and a ring around the sides. The olive oil will hold it in place. Now, once you've got it installed, oil the face of the parchment as well.

If you are going to make a baby focaccia to experiment with different toppings, prepare a smaller pan in the same way.

Pop the dough into the pan, gently spreading out to the sides of it. Drizzle a small amount of oil over the top and smear it a bit. Cover with a plate and refrigerate for 10 hours. This seems to be the magic number for focaccia, resulting in a non-acidic final bread.


BAKE DAY

You will need:

1 fennel bulb in good shape
1 or two baby eggplants
A few pinches of good salt, for instance fleur de sel
About 2 teaspoons of your really fine olive oil

One hour before you plan to bake the bread, preheat the oven to 550 degrees, installed with a baking stone and a pot filled with lava rocks (this should be place on the floor of the oven). Remove the dough from the fridge now too.

Now, neatly slice your fennel and eggplants so that you arrive at 1/4" thick cross sections that include some of the green top. Arrange over the top of the dough in some comely fashion, pressing the vegetables down into the dough gingerly, you don't want to deflate it, but if you don't sort of embed them, they will float right off of the dough during oven spring.

Leave the dough rest at room temp during this hour of oven preheat to regain its shape.

When you are ready to bake, add some ice cubes to a 3 cup measure and fill with with water. Set aside.

Sprinkle the face of the dough with the fleur de sel and drizzle with the olive oil, spreading it a bit so that the surface takes on a golden sheen. Slide the focaccia onto the stone, then pull out the pot of lava rocks a bit and pour the ice water over the rocks. Quickly slide the pot back into the oven and steam for 10 minutes at 500 degrees.

After 10 minutes, turn the oven down to 460 degrees and steam for 10 minutes more for a total of 20 minutes steam. After the steam, remove the lava pot from the oven and bake out at around 450 till the loaf has properly browned, spinning it now and again for even heating. Keep the heat low on this one, because it it inclined to burn.

Cool the loaf for about 15 minutes on a wire rack before turning it out of the pan and cooling for a further hour. You should not have an issue with sticking due to the savvy use of parchment. To serve, scatter with fresh green fennel frond and share with a friend.


To the staff of life!

Monday, August 18, 2014

Focaccia Pericoloso

So, I have been tinkering with focaccia formulae forever, and what I have come to is this: they taste better (and the texture is better) when made with predominately white flour. I will tell you, I have made quite a few with varying amounts of whole grain as well as types, and sundry methods/fermentation times. Those with larger amounts of whole grain always arrive tough or chewy and compressed. It's a good thing I have no aversion to white flour, indeed sometimes nothing but a white flour loaf will satisfy. In this case, it really makes a glorious bread.


I also employed a little semolina and durum rimacinato because I like the sweetness/nuttiness and tenderness that it contributes to our breads. Plus, durum is just that grain that you think of as Italian, so, why not use it in focaccia.

I futzed around with fermentation times this past week, and arrived at the following: 18 hours is too long. It makes for a more acidic focaccia, 8 hours didn't develop the flavor as much as I wanted it to, and 12 hours seemed to be just right. 10 might work as well, in terms of reduced acid and flavor development, so you might try that. What you see here is a 12 hour ferment.


I also tried experimenting with a free form thing, a cast iron loaf, and ended up happiest using a standard 9-inch cake pan. A little smaller in circumference than my cast, but the sides are higher which is necessary. With this amount of dough, you really need the extra height to contain it. It might work in a cast if you cut off about 25% (perhaps toss this extra bit in a smaller pan or bake it free-form). I may have to give this a try. But it indeed developed a fabulously crisp crust, which I was afraid I would have to sacrifice using a cake pan. I'm sure the efforts of the olive oil contributed to the development of such a rich and crisp crust here. One word of caution: line the sides of the pan with a ring of parchment. I did not (thankfully I lined the bottom with it) and it ended up sticking. I was able to successfully loosen it with a thin blade run along the inside of it, but it took some doing. Next time, I will definitely reach for the paper.


Given that the virtues of white flour are relied upon in this focaccia, I used none other than Giusto's Artisan flour. I've tried several of Giusto's styles of flour and this is my absolute favorite (their 00 is nonpareil for pizza dough and pasta). You can only buy it online from their website, and if you do go about this, purchase a case. Trust me. It makes for the best artisan bread, ever. Super crisp crust with excellent caramelization (think: blisters), and a good gelatinous crumb with a fantastic creamy flavor. I still remember the first loaf I made with the stuff.


The use of the whole onion as an enhancement was borrowed from a pin I saw on pinterest. The photo was of a farmer's market stall in Sweden. A table was piled high with a sundry of breads, and a group of lovely whole-onion focaccia caught my eye. Blurred and in the corner of the photo though they were, elbowed by the hundred other loaves surrounding them, they were dazzling. The hand-scrawled chalkboard tablet in front of a queue of the loaves announcing the variety was written in Swedish, so I decided to borrow the essence and make up the rest.

On a final note, you will try your hand (no pun intended; read on...) at our latest steam contraption with this bread, that is to say a pile of lava rocks in a pan growing almost molten on the oven floor with a goodly amount of ice water heaved onto them once the dough has been loaded. An admonishing word: arm yourself with a long nose lighter. If your oven is as shabby as mine, the initial blast of steam will likely blow out the pilot light, and since mine is in the back of the broiler, well, you can imagine how daunting it is to shove your hand into some narrow 550 degree nether region to relight the thing. Heart. Goes. Pounding.

Without further ado, I give you the focaccia that damn near claimed my hand.

Focaccia Pericoloso


LEVAIN DAY

Three days before you plan to make your levain, throw your starter into overdrive by feeding it three or four times each day. On the fourth day, build your levain by mixing up the following:

10g 100% hydration starter of your choice
75g h2o
75g freshly ground hard red wheat flour (you can also use 75g rimacinato - double milled - durum wheat flour, which I used in another experimental focaccia and it came out beautifully. In that case, use about 82g of water when you mix up your levain. For this loaf's levain, I used whole wheat flour)

Mix up the above. Ferment. Mine fermented for 8.5 hours.

DOUGH DAY

You will need:

All of the levain
50g freshly milled durum, milled to rimacinto
50g freshly milled durum, milled to semolina
400g Giusto's Artisan flour
380g h2o
20g good olive oil, I used California Olive Ranch
12g salt
1 good-sized sprig of fresh rosemary
1 spring onion

When the levain is at its peak, mix it with the flour and h2o until you reach a shaggy mass. Autolyse for 1.5 hours (an hour will suffice, the only reason I autolysed for this long is because my morning errands took longer than I thought they would, and I post all my formulae with absolutely no embellishments or tailoring).

After the autolyse, chop your rosemary leaves, medium-fine should suffice. Squish the salt, olive oil and rosemary into the dough until thoroughly amalgamated.


Now time for your 4-hour bulk fermentation.

Just before your first series of turns, thinly slice one of the onions, mine was about 50g (reserve the other whole onion for use tomorrow on bake day). At the first turn, sprinkle the onions over the dough and turn as you normally would. With each succession, they will distribute throughout the dough.

You will not perform turns through the entire 4-hour bulk, instead, you will intuitively know when it is time to stop by the rate of the dough's expansion. I stopped my turns at 3 hours, left it be at room temp for another half hour, then popped the dough in the fridge for the remaining half our of bulk because it was really warm in L.A.

After the bulk fermentation, scrape the dough onto a worktable that you have smeared with good olive oil, gather it into a loose round and let it rest for about 10 or 15 minutes. Meanwhile, with a very small amount of olive oil, oil the sides and bottom of a cake pan with a removable bottom (9" wide, measured on the inside x 3" deep); fit with a circle of parchment along the bottom and a ring of the stuff around the sides. The olive oil will hold it in place. Now, once you've got it installed, oil the face of the parchment as well.

Pop the dough into the pan, gently spreading out to the sides of it. Drizzle a small amount of oil over the top and smear it a bit. Cover with a plate and refrigerate for 10 - 12 hours, mine went for 12.


BAKE DAY

You will need:

1 spring onion in good shape
A few pinches of good salt, for instance fleur de sel
About 2 teaspoons of your really fine olive oil

One hour before you plan to bake the bread, preheat the oven to 550 degrees, installed with a baking stone and a pot filled with lava rocks (this should be place on the floor of the oven). Remove the dough from the fridge now too.


Now, neatly slice up your remaining onion so that you arrive at 1/4" thick cross sections that include some of the green top. Arrange over the top of the dough in some comely fashion, pressing them down into the dough gingerly, you don't want to deflate it, but if you don't sort of embed them, they will float right off of the dough during oven spring. Keep the dough even, meaning, don't press down really hard over the bulb of the onion and leave the other half unpatted or your focaccia will bake up flat at the bottom bulb half, and remain lofty at the top. I scatted some slivered onion over the rest of the dough as well, patting them into the dough gently.

Leave the dough rest at room temp during this hour of oven preheat to regain its shape.


When you are ready to bake, fill up a 4 cup measure with a full tray of ice cubes and top with water. Set aside.

Sprinkle the face of the dough with the fleur de sel and drizzle with the olive oil, spreading it a bit so that the surface takes on a golden sheen. Slide the focaccia onto the stone, then pull out the pot of lava rocks a bit and pour the ice water over the rocks. Quickly slide the pot back into the oven and steam for 10 minutes at 500 degrees.

NOTE: Here is where you want to check your pilot light, and pray, figure out how to light it before employing this steam method. You have to light it quickly if it goes out on you, no time to be surfing the net looking for you particular oven's instructions, all the while, your dying loaf...

Carrying on.

After 10 minutes, turn the oven down to 475 degrees and steam for 10 minutes more for a total of 20 minutes steam. After the steam, remove the lava pot from the oven and bake out till the loaf has properly browned, spinning it now and again for even heating. Mine took a total of 55 minutes, but rely on your thermometer, taking it to 210 degrees. You may need to lower the head to 450 for the last 10 minutes of cooking so that it does not burn.

(I never bake without my trusty Thermopen, 5 degrees really can make a difference between perfectly baked and a bit underbaked, and unpleasantly so. Speaking of, better to air on the side of greater than 210 degrees than less).

Cool the loaf for about 15 minutes on a wire rack before turning it out of the pan and cooling for a further hour. You should not have an issue with sticking, but if you did not line the sides of the pan and the focaccia refuses to release, run a thin blade along the sides of the loaf then carefully push the removable bottom upwards to release it (using oven mits, of course). I pray to goodness that you in the very least parchmented the bottom of the pan.


To the staff of life!

Sunday, August 3, 2014

Wild Rice & Bay Fendu

OK. When I say 'fendu', I use this word gratuitously. As you all know, I suck at shaping anything other than a boule. Batards, baguettes, forget about it. I am fairly unambitious with bread shaping, so I never get better at it. Which is fine by me. But every now and again I fancy that I'm an actual baker, and then I am humbled when I try to do something outside of a neat little ball.


Wild Rice & Bay Fendu

So, this week's bake brings two new things to the blog. I had this fantastic idea for a wild rice loaf flavored with fresh bay because I have a beautiful laurel bay plant in my kitchen, and wild rice just sounds lovely. At first I thought I might just cook some of this black grass up and add it to the dough, but then I got the wild idea to mill some of it up into flour to further enhance the loaf.


When thinking about the bay, I knew I didn't want to stash any inside the actual loaf (i.e., if I decided to go with a boule), because slicing into it would result in woody bits in the mouth. No Good. This brought me to the grand idea of fendu. In my crazy imaginings, I would shape it perfectly, encasing a few of the aromatic leaves within the split. It would proof up smashingly, hugging the leaves through the bake, whereafter I would pluck them out and wind up with an exotically-flavored bread.

(admittedly a little phallic...)

Well, most of this was true, only my fendu opened up during the bake. After the steam I was a little dismayed, but when all was said and done, despite my lack of shaping prowess, I was tickled pink with the resulting loaf.


The cool part of the experiment is that I got to work with another method of steam. Our combo cooker has been our crutch for so long, and I have tried every method of getting steam into my oven with very poor results. All of my non-boule breads end up spreading with the lack of steam, and the resulting loaves are always flat. This time I used lava rocks that I doused with ice water when the dough was loaded into the oven, and the bread achieved marvelous oven spring (happy face). This may be the start of a new love affair with alternative shapes, now that I know what glorious steam the lava rocks create in the oven.

So, let me describe the bread: in a word, heavenly. But beyond that, the crust was super shattery, and such a wonderful ratio of crust to crumb. I was worried that the rice bits would be super tough on the outside of the loaf, but nothing could be further from the truth. While working with whole grains in my breads, I do try to encase as much of the grains within the dough when I turn and shape because they can bake out a little tough. Here, the bits that remained on the outside of this loaf added a pleasant crunch to the already crisp cortex.


The crumb was superbly tender and open, and the flavor, wow. A sweet earthy quality from the wild rice, and the bay permeates the loaf delicately, lending a lovely resinous and spicy perfume.


For this bread I milled up some white whole wheat (Bob's Red Mill hard white wheat berries) along with the wild rice. I also used Giusto's Ultimate Performer and Golden Haven. I added just a pinch more salt that I normally do to compensate for the addition of the wild rice. I never knew I could bake up such a glorious thing!

Without further babble, here is the method for our wild rice & bay fendu in all its glory.


.
LEVAIN NIGHT

Three days before you plan to make your levain, throw your starter into overdrive by feeding it three times each day. On the fourth day, build your levain:

12g 100% hydration dark rye starter
75g freshly milled white whole wheat flour, I used Bob's Red Mill hard white wheat berries. 
75g h2o

DOUGH DAY

You will need:

All of the levain
350g h2o (you will underhydrate here and the dough will feel a little on the dry side, but the wild rice adds water to the dough, so resist the temptation to add more water at this point)
317g Giusto's Ultimate Performer
83g Giusto's Golden Haven flour
75g freshly milled white winter wheat flour, I used Bob's Red Mill hard white wheat berries
25g freshly milled wild rice
175g cooked wild rice
13g kosher salt, I used Diamond


Wild Rice Flour

When the levain is at its peak, mix it with the flours and h2o until you reach a shaggy mass. Autolyse for one hour. During this hour, make your wild rice. 4 parts water to 1 part wild rice. To arrive at what you need here, you will need 2 cups of water and 1/2 cup wild rice. Cook till tender, about 45 minutes, drain and rinse with cold water using a fine-mesh strainer. Set aside.

After the autolyse, squish the salt into the dough so that it is thoroughly incorporated then fold in the wild rice.


Now begin your 4-hour bulk fermentation. Here you will perform a series of turns for the first two hours of bulk. Leave it be for the final hour. My bulk was done at room temp for the most part, even though it was in the 80s here in L.A, but I did refrigerate it for the last 45 minutes because it began to expand rapidly at this point.


After the bulk fermentation, scrape the dough onto a worktable that you have dusted with brown rice flour, gather it into a loose torpedo shape and let it rest for 10 minutes.

After it has rested, shape it into a neat batard. Now, flip the dough seam-side down, and using a dowel or a thin rod of some sort. All I had was a French rolling pin. Likely part of the problem. Make a wide moat in the dough by rolling the dowel back and forth, trying to maintain equality on both sides of the moat. As you can see, I was not as fastidious as I should have been and ended up with one more shallow side. When you have accomplished this, roll either side of the dough back toward the center firmly, then slip in a few bay leaves. This is where I started to have trouble. My seam would not stay closed, and the sides of my dough kept rolling open relentlessly. So I ended up pinching the ends of the torpedo before placing into the banneton. This is going to take more practice.

If you want to learn how to properly shape a fendu, see Susan's post here. If you want to learn how to shape any loaf, defer to Susan. She is the mistress of shaping bread.


Place the dough seam side down, being careful not to dislodge the leaves, so that when you flip it on bake day, it will land seam/leaf side up. Moving along... pop it into a banneton, which, incidentally, I don't have. I used my Staub 4.5 quart oval roaster lined with a thick piece of canvas, and inserted rolled up pieces of this canvas into the sides of the pot so that the dough would not expand too widely.


Cover and get it into the fridge and ferment. Mine fermented for 18 hours 45 minutes.

BAKE DAY

One hour before you plan to bake the bread, preheat the oven to 500 degrees, installed with a baking stone and cast iron pot loaded with lava rocks which you have placed on the oven floor.

After the hour preheat, remove the dough bowl from the fridge, place a piece of parchment over the mouth of it, then a pizza peel on top of this, now flip the whole thing over so that the dough ends up on top of the parchment and peel. Remove the linen (if you have over dusted, now is the time to brush away any loose flour. I know, I have been the victim of some snowy loaves too).

Fill up a 4 cup measure with 3 cups of water and a full tray of ice cubes. Set aside.

Slide the dough onto the stone, then pull out the pot of lava rocks a bit and pour the ice water over the rocks. Quickly slide the pot back into the oven and steam for 15 minutes at 500 degrees. After 15 minutes, turn the oven down to 475 degrees and steam for 15 minutes more. After the steam, remove the lava pot from the oven and bake out till the loaf is chestnut brown, spinning it now and again for even heating. You may need to lower the oven to 450 for the last 10 minutes of cooking so that it does not burn. You want that crack down the center to bake out thoroughly. Mine took about 55 minutes to bake, I believe.

Cool the loaf for a full hour, and remove the leaves before slicing.


To the staff of life!

(This post was sent to Susan's Wild Yeast Blog)