
Growing up, my family cared for a menagerie of odd animals - rodents, snakes, newts, anoles, aggressive bullfrogs - but we also had dogs and, my favorite, parakeets. My mother would teach them to curse when she cleaned out the cage. There is nothing quite like entering a room lain with a carpet of swear words and whistles.
When it came to feeding time, this was my business. I always wanted to feed them three-times what my mother would allow. It just seemed like such a teensy amount. I would myself nibble on the shiny little beads of seed, the little birds cooing 'F-you, F-you' in my ear. Of course, the little yellow pellets were the best. Millet. Crunchy and mealy and strange.

Millet is one of those things that people approach with apprehension. It is a seed, yeah, not a grain. In America it was only ever used as bird fodder, though we have all read in our Encyclopedias that it is an important staple in Africa. It would take the hippies decades to sing of its virtues before successfully raising it from exoticism and ignobility alike.
I've been eating millet for as long as the hippies have been extolling it. For me, it's the same as reaching for brown rice or the more highly-esteemed quinoa. Here's a tidbit: millet is said to reduce cellulite (most important), and it is also proven to reduce the risk of heart attack, migraines and the severity of asthma. This ought to get you all cracking then on this loaf of bread whether for health or vanity.

This loaf was an experiment. I had some millet, I wanted to use it up, and this is a bread that I have neither read about nor experimented with. Here's some helpful advice: I actually use millet to clean out the Komo between millings because it's cheap. After milling your flours, run a cup or two of millet through the machine on a coarsish grind and it will gather up the collecting flour and dash it out of the machine. This is especially helpful if you are making durum rimacinato regularly, since the very fine flour has a tendency to cake up in there and shoot out in nasty little sheets the next time you move to make flour.

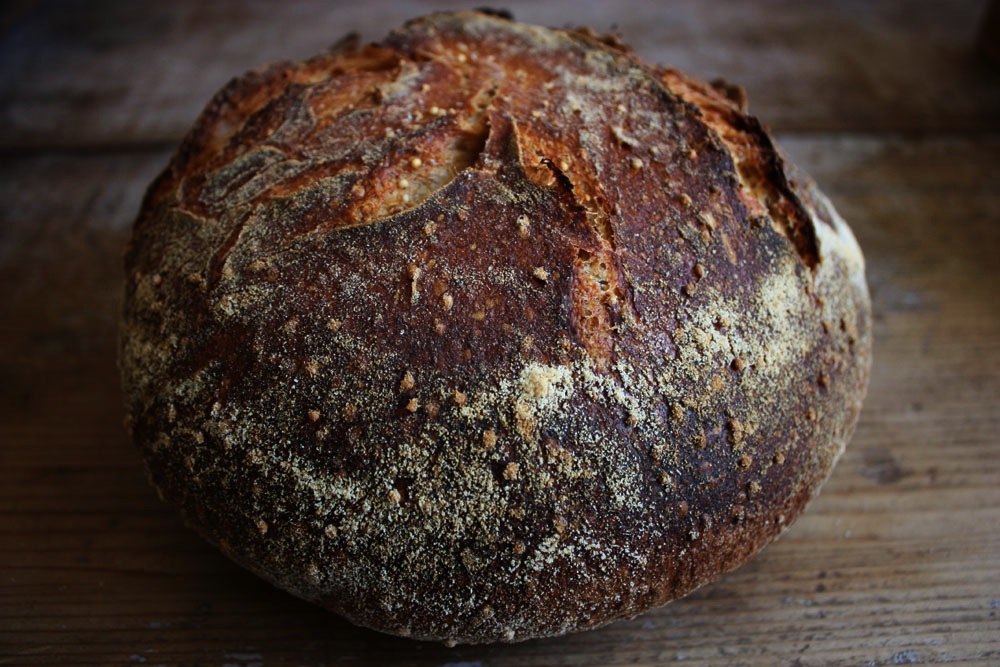
I have to say. Wow. This bread turned out amazingly. I first toasted up a measure of millet, ground some of it up into flour (52g) and added the whole toasted and soaked seeds to the dough (75g). The resulting loaf turned out nutty and toasty and delicious. The little seeds tenderized during baking, so, no crunchy little bits here. I also added some freshly milled Bob's Red Mill hard white wheat flour to the dough (107g), and the remainder of the flour was, of course, my beloved Giusto's Artisan. The shattery crust was beautifully festooned with little golden beads, making the loaf not only heavenly to taste, but glorious to behold.
It's impossible to keep from eating slice upon slice of this bread. So the next time someone accuses you of eating like a bird, you might think of this loaf, smile knowingly and say, 'Yes, yes I do.'
I give you this week's bird seed bread.

3 or 4 days before you make your levain, kick it into high-gear by feeding it 3-4x a day. On levain day, you will need:
*To toast millet, just pour the total amount of millet needed for your formula into a cast iron pan, and over high heat, toss the millet ceaselessly in the hot pan until it turns golden brown. For this formula, toast the total amount of millet needed, then grind 52g of it into flour and soak 75g overnight on the counter. I just poured this amount into a glass measure, filled it with water and let it be.
Back to the formula.
When it came to feeding time, this was my business. I always wanted to feed them three-times what my mother would allow. It just seemed like such a teensy amount. I would myself nibble on the shiny little beads of seed, the little birds cooing 'F-you, F-you' in my ear. Of course, the little yellow pellets were the best. Millet. Crunchy and mealy and strange.
Millet is one of those things that people approach with apprehension. It is a seed, yeah, not a grain. In America it was only ever used as bird fodder, though we have all read in our Encyclopedias that it is an important staple in Africa. It would take the hippies decades to sing of its virtues before successfully raising it from exoticism and ignobility alike.
I've been eating millet for as long as the hippies have been extolling it. For me, it's the same as reaching for brown rice or the more highly-esteemed quinoa. Here's a tidbit: millet is said to reduce cellulite (most important), and it is also proven to reduce the risk of heart attack, migraines and the severity of asthma. This ought to get you all cracking then on this loaf of bread whether for health or vanity.
This loaf was an experiment. I had some millet, I wanted to use it up, and this is a bread that I have neither read about nor experimented with. Here's some helpful advice: I actually use millet to clean out the Komo between millings because it's cheap. After milling your flours, run a cup or two of millet through the machine on a coarsish grind and it will gather up the collecting flour and dash it out of the machine. This is especially helpful if you are making durum rimacinato regularly, since the very fine flour has a tendency to cake up in there and shoot out in nasty little sheets the next time you move to make flour.
I have to say. Wow. This bread turned out amazingly. I first toasted up a measure of millet, ground some of it up into flour (52g) and added the whole toasted and soaked seeds to the dough (75g). The resulting loaf turned out nutty and toasty and delicious. The little seeds tenderized during baking, so, no crunchy little bits here. I also added some freshly milled Bob's Red Mill hard white wheat flour to the dough (107g), and the remainder of the flour was, of course, my beloved Giusto's Artisan. The shattery crust was beautifully festooned with little golden beads, making the loaf not only heavenly to taste, but glorious to behold.
It's impossible to keep from eating slice upon slice of this bread. So the next time someone accuses you of eating like a bird, you might think of this loaf, smile knowingly and say, 'Yes, yes I do.'
I give you this week's bird seed bread.
This formula makes one loaf
MAKE YOUR LEVAIN
3 or 4 days before you make your levain, kick it into high-gear by feeding it 3-4x a day. On levain day, you will need:
11g 100% hydration dark rye starter (mine is made with BRM home-milled dark rye flour)
75g h2o
Mix the levain ingredients together until you reach a paste. Mine fermented for about 8 hours.
DOUGH DAY
You will need:
345g h2o
345g h2o
341g Giusto's Artisan flour
107g Bob's Red Mill hard white wheat
52g toasted* millet flour*
75g toasted* millet, soaked overnight (on the counter is fine) and drained well
13g kosher salt, I used Diamond
All of the levain
*To toast millet, just pour the total amount of millet needed for your formula into a cast iron pan, and over high heat, toss the millet ceaselessly in the hot pan until it turns golden brown. For this formula, toast the total amount of millet needed, then grind 52g of it into flour and soak 75g overnight on the counter. I just poured this amount into a glass measure, filled it with water and let it be.
Back to the formula.
When your levain is properly fermented, mix together the levain, the flours, the soaked and drained millet and the h2o until you reach a shaggy mass. Autolyse for 1 hour.
After the autolyse, the dough should have expanded a bit. Squish the salt into the dough until it's fully incorporated work the dough into a smooth mass. Now it's time for the 4-hour bulk fermentation.
Every half hour, perform a series of turns, taking care not to deflate the dough as you near the end of bulk. You will likely stop your turns somewhere around 2 hours into the bulk. For the remaining bulk, leave it untouched. I did two hours of turns, left it untouched at room temp for an hour, then popped it in the fridge for the final hour because it has been really warm here.

When bulk fermentation is accomplished, turn the dough out onto a workspace dusted with brown rice flour, and shape into a loose round. Let it rest. Mine rested for 10 minutes.
After the bench, shape the dough into a taut boule. I am a huge fan of the 'Forkish fold', so, I shaped the boule and popped it into a bowl lined with linen that I have first dusted with brown rice flour (you may use a banneton), seam-side down.

The next day when you unearth the dough, the seam-side lands upward, and it is at these fissures that the steam is released, thus the dough will open erratically and beautifully.

Alternatively, you may shape your boule placing it seam-side up in the banneton or linen-lined bowl, then on bake day, you can unearth the dough and score as desired with a blade.
The next day when you unearth the dough, the seam-side lands upward, and it is at these fissures that the steam is released, thus the dough will open erratically and beautifully.
Alternatively, you may shape your boule placing it seam-side up in the banneton or linen-lined bowl, then on bake day, you can unearth the dough and score as desired with a blade.
Pop in the fridge and ferment. Mine fermented for 19 hours.
BAKE DAY
Preheat the oven to 500 degrees with a dutch oven and baking stone inside.
Pull the dough of of the fridge. Pop a piece of parchment over the mouth of the bowl, then place a peel over this. Quickly invert the bowl so that the dough ends up sitting on the paper and the peel, seam-side up for the Forkish fold method, seam-side down if you plan to slash.

The 'Forkish fold', dough lands seam-side up
If you plan to slash, then do so in some divine manner first before getting the dough into the oven. For the Forkish fold, just slide the dough immediately into the shallow half of the hot dutchie. With both methods, after the dough has been slid into the pan, cover with the fat half of the dutchie, slide the contraption into the oven, and steam for 15 minutes at this temp, then turn the oven down to 475 and steam for another 15 minutes.
After the steam, remove the fat end of the dutchie, then stack the pan over its mouth to create a buffer between the hot stone and the bread. This will help keep the bottom of your bread from blackening.
Toggle the oven between 460 and 475 until the boule is baked to chestnut brown. Cool on a wire rack for at least an hour before slicing.


This post has been shared on Susan's Wild Yeast Blog.
To the staff of life!
This post has been shared on Susan's Wild Yeast Blog.
To the staff of life!


