
So, we have Flashback Fridays where I revisit oldies and goodies, make amends with breads that I ruined, or say bonjour to those breads I never visited at all (Yikes! Sorry neglected breads!). And now we have Sidebar Sundays where I get to do my own thing sans Chad. I'm sure he won't mind.
Oh, and yes. I am aware that it is Tuesday. Sorry. I'm a little late. But you'll forgive me, I know.
In this post:
- Green flour: what is it?
- Freshly milled flour: to age or use fresh?
- What the chemicals in our store-bought flour mean
- Bluebird Grain Farms hard white spring wheat
- Bad news baguettes
- Introducing Michette, my newest love child
So, baguettes are a tricky thing. They take a lot of experimentation to master them. And this is why you don't see a baguette post today. Actually, I'm a few days behind on a new post because I did attempt the baguette formula (15 baguettes!) but I had trouble with it, so I decided to go back to the drawing board and come round again next week with it.
I think since I have always been less than thrilled about working with commercial yeast, the baguette appeal has been less than lustrous for me. I have admittedly approached them a little half-heartedly, if not with heels staunchly digging in the sand. Not just this week, but generally.
Like most of my baguette attempts (I've only ever had two successful attempts), this last batch was OK. But only just. We ate them, but we were not dazzled by them. The crust was too strong, as was the crumb, they took up too much time and space, and the shaping, oi. I'm not a good baguette shaper. At the end of the baguette day I felt disappointed. Alas, it has been a very long time since I had a bread mishap, so, I let this go as a much needed bread (life) experience, and instead of skirting the baguette issue, I decided to simply dig in from here on out. It is said that that the thing one holds the most aversion to is the thing that shall free him or her. Actually, I think I'm making that up, but it feels instinctual that this should be true. So, okay, I'll dig in... starting next week. In the meantime, I am tickled pink to share my new love child with you.

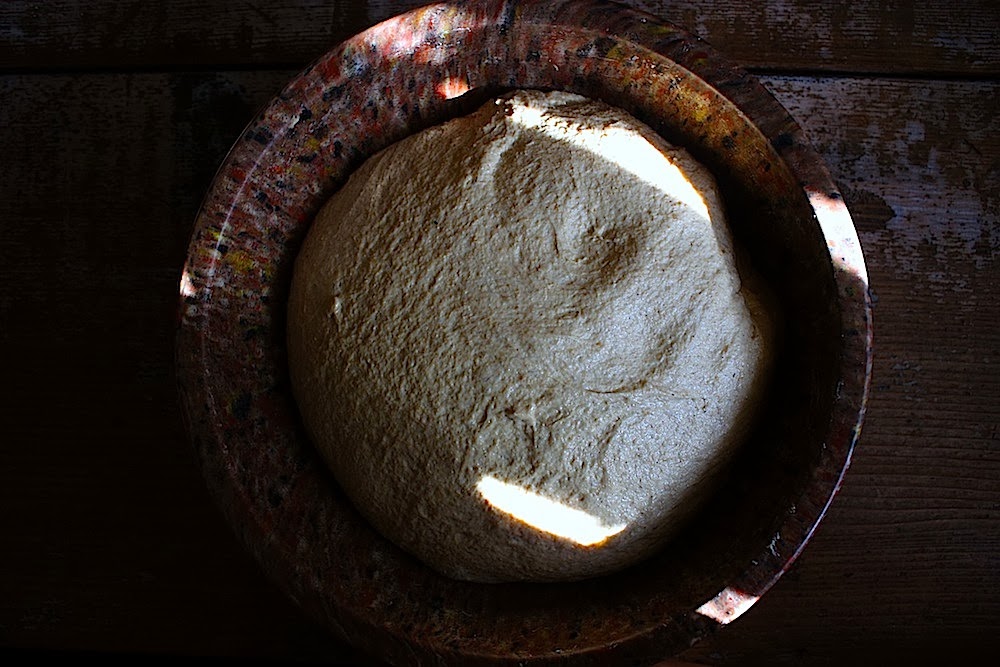
Michette
So here's me making lemonade: about four weeks ago I set out to create my own 100% whole grain, 100% white wheat bread, that was not flat or hard or gross. I wanted it to be made completely with home-milled grain both whole and hand-bolted (the old-school way of making 'high-extraction' flour; we are going to talk about this later). I wanted it to have a fantastic shattery crust and a really fragrant and exquisitely flavored crumb. What you see above is my first go round, and I must say, the crust was as shattery as a girl could hope for, and the crumb was so lovely and light and moist, I can't even explain the texture. It was gorgeous. And the taste of it, why, my first nibble was delightfully fruity! Alas, my little loaf was flattish. Not flat, mind, flattish.


And you know me, I simply had to get to the bottom of it, so I phoned my friend Joe, a professional bread baker in New York, and gave him my formula from start to finish. The first thing Joe said, because he has a masters in diplomacy, was: 'I love the crumb of your new bread. It is more reminiscent of a French miche, which has a tighter crumb and lower profile.' Thus, my sweet Michette was born.

But then he got down to brass tacks. After reviewing my formula, he said that the culprit could be one or a combination of these things: overfermentation, because freshly milled flour can sometimes ferment faster than flour we get at the store, and green flour.
Wha, who, huh?
Yes. Green flour. I was as much in the dark as you, so I set out to do some serious research, and here is what I found:
Green flour, as it is called, is freshly milled flour. So, the flour that we freshly mill at home, or the flour freshly milled at a flour mill is considered green. The reason why we need to discuss this is because as home-millers, the properties of green flour seriously affect the outcome of our breads. Let me break it down simply.
When grains are freshly milled, the gluten content is immature and will behave poorly in bread baking as it is not strong enough to raise our dough properly. This is evident in poor oven spring, flat loaves, dense crumb and tough crusts. So, we must oxidize (age) our flour before its use (there is one loophole to aging, which you will discover as you read on). Oxidation of flour occurs like this: the thiol groups and sulfide bonds are proteins in flour. When flour is oxidized, meaning, when oxygen penetrates it, these two groups strategize and create disulfide bonds. It is this disulfide bonding that strengthens gluten bonds in the flour itself, which later allows gluten strands to develop favorably, thereby strengthening the dough. When flour is not properly oxidized, the disulfide bonding remains fractional, thus the gluten will not be properly developed when the dough is mixed, resulting in weak dough structure and the aforementioned issues. Granted, the flatness of my pretty Michette was not what I consider catastrophic, and the crust and crumb were simply splendid. I just knew she had more potential.

So, here's the scoop on the aging process. Commercial milling houses age their flour with various chemicals that oxidize the thiol groups of proteins in flour, namely gaseous chlorine, used primarily for cake flour, which acts as a whitening agent, and 'matures it' swiftly, meaning that it stabilizes the flour so that it behaves more consistently; and benzoyl peroxide which artificially and instantly oxidizes other white flours thus strengthening the gluten bonds and whitening it. Both of these artificial oxidizing processes speed up the disulfide bonding and result in flours that can be used immediately in bread baking so the flour mills don't have to spend money on the most costly and healthful way to age flour: time.
Unfortunately, these bleaching agents adversely affect the flavor of the flour by destroying the carotenoid pigments in it. These pigments are what cause a creamy color in unbleached flour and the smell of bread when it's baking. The more carotenoids in flour, the more flavor and nutrients there are.
Next up is ADA (azodicarbonamide), also known as 'Maturox'. This chemical oxidizes the thiol groups of proteins in flour and strengthens the dough just like the processes above, but it is a swift-acting agent, meaning that it is activated and works in the early part of dough makeup, which can wreak havoc for bakers who use slow fermentation processes, i.e., artisan bakers who use pre-ferments. While it does cause bread to achieve immense oven spring, it is best used in breads that require very short fermentation times, i.e., commercial bread making facilities would benefit from using ADA in their non-artisan breads because they don't slow-ferment their beads. Flour that has been conditioned with ADA has to be legally be labeled 'bleached'.

Bluebird Grain Farms Hard White Spring Wheat Berries
Another really scary chemical used in baking in the United States is potassium bromide, or 'bromate'. You have seen non-bromated flour and bromated flour on the shelf. Potassium bromate 'conditions' flour and allows bread baked with it to achieve immense oven spring. But it comes at a price: it's carcinogenic. Studies have shown that it creates tumors in lab rats and has consistently demonstrated a link to cancer. Bromates are banned in Canada, Europe and Japan, but as mentioned, can still be used in the United States. However, California's Prop 65 has recognized its carcinogenic properties and requires all baked goods and flours containing bromate to bear a warning on their labels if sold in California, but only if the levels exceed an approved level, meaning flours and baked goods can contain below the approved amount without stating so. In response, most California bakers have switched to bromate-free flours because of the warning label requirements. But frankly, it's alarming that we still allow it at all. America. Big business. What is good for the consumer is often secondary.
Finally, another way to age flour is by the addition of ascorbic acid (vitamin C). Vitamin C really tautens your dough, seriously hampering extensibility. Evidently it improves oven spring and I have read that bakers can add it to the dough later in the mixing process to this end. It doesn't seem like a positive tradeoff to me, even if it is an innocuous addition. If I have to fight with my dough, it seems like a rather unpleasant option.
OK. If you are now totally freaked out and overwhelmed about aging your flour or disenchanted by home-milling, you shouldn't be! There are two natural and easy ways to circumvent the lack of oven spring, dense crumb and tough crust using home-milled flour. One is time, the other is speed, and this is the focus of today's experiment.
So, onto that.
I set out to do an experiment with Joe's theory, beginning with the green flour issue. My adorable Michette above was used with flour that I milled one morning then used the next day, about 15 hours later. Evidently, if you mill flour and use it after 8 - 12 hours, an enzymatic situation happens which results in the flattish loaves. HOWEVER, if you mill grains and use them straight away, whatever enzymatic situation that occurs after 8 - 12 hours that causes angry loaves does not occur, and your loaves will happily achieve great oven spring.

Michette, fresh


Alternatively, if you cannot use your flour right away (within the first 8 - 12 hours of milling), you can age it simply by putting it in a paper bag for at least 3 weeks (or you can do what I did and just put it in a jar and cover the mouth of it with cheesecloth so that oxygen can enter). Oxygen will gently penetrate and 'age' your flour, and all of that disulfide bonding will successfully occur, thus resulting in strengthened dough and fabulous oven spring. I had great results by aging my flour for 3 weeks and 2 days in a wide-mouthed jar which I covered with cheesecloth.

Michette, aged


Both of the new Michettes achieved excellent oven spring, as you can see. So, Joe was right about everything, and this is not the only time he has come to my rescue. I am so lucky to have access to a professional bread baker so that when things go awry I can get answers quickly, or be led in the right direction. There is nothing more frightening than having questions without the prospect of answers, or worse, conflicting answers that you have discovered on the internet.
Thank you Joe!
So, to sum things up here is what you want to do when working with freshly milled flour:
1) Mill and use your flour straight away, before the enzymes that wreak havoc on your loaves kick in. So, the sooner the better, but not after 12 hours, and your loaves will achieve fine oven spring (I personally would mill right before I was about to make my dough. Why wait even an hour?)
2) If you cannot use your flour right away, then age it for at least three weeks in a paper bag or a jar covered with a piece of cheese cloth to the same end.
I should also note that the original Michette was fermented for 18 hours, and with the final two, I reduced the final fermentation to 11 hours. A smart move, and Joe was right. My had original Michette overfermented. A note here. This is not true of all breads made from freshly-milled flour, but with white wheat, I have noticed that it ferments very quickly. The timing seems to be much more in the realm of my high-percentage ryes, which I ferment to about 9 hours. I would not push this loaf past an 11-hour fermentation. I have made hard red wheat breads with freshly milled flour and employed long fermentations with fine results. With white wheat, assume that it will (even commercially milled) ferment quickly. I will be experimenting with long fermentations and other grains in upcoming posts so you can have some sort of fermentation gauge for your own loaves using freshly milled grains.
Some of you have been emailing me about your flat loaves. I am hoping that perhaps this post has shed some light on this issue if you are milling your own flour.
Oh, before I get on with the formula, I wanted to talk about the wheat that I used.

For all of these loaves of bread I used 100% Bluebird Grain Farms hard white spring wheat whose plump grains smell fabulous and sweet like wet hay. It's very fresh, and you know this because when you mill it, you have to put it on a coarser setting because fresher grains are more hydrated and don't mill as well in the KoMo mill on a fine setting. Even setting it to a coarser grind, however, you end up with a very fine flour. As you can see from all three loaves, it mills up beautifully. The loaves were fantastic - mild, fruity, gorgeous tasting breads, all three with uber brittle crusts and a very moist crumb. I could not have chosen a better white wheat for my Michette. I traditionally bake rye loaves every week as my mainstay breads, and I have to admit, my 100% whole grain Michette is my new weekly bread of choice.
Have a look.
100% Bluebird Grain Farms White Whole Wheat Michette
MAKE YOUR LEVAIN
For the levain, you will need
75g Bluebird Grain Farms home-milled hard white spring wheat
75g h2o
10g 100% hydration, 100% rye starter
Mix together your levain ingredients and ferment. Mine fermented for around 7 hours.

DOUGH DAY
For the dough, you will need
All of the levain
350g - 389g h2o (see note on hydration just below)
206g Bluebird Grain Farms home-milled hard white spring wheat
294g Bluebird Grain Farms home-milled hard white spring wheat, bolted with a fine-meshed sifter
12g kosher salt, I used Diamond
A note on hydration.
So, whenever you review a formula, before just dumping the suggested amount of water into your bowl of flour and levain, approach it with a conservative hand. Depending upon what sort of flour/grain you are using, you will probably need more or less water than any formula calls for. For instance, freshly milled flour is is warmer than flour that has been sitting on a shelf if you use it relatively quick after milling (I swear by my Thermoworks instant read thermometer for taking temps now. It's fast and accurate), and is always a little more thirsty. This is where your extraordinary baking powers come in. I always approach the hydration in any formula mindfully. If Chad calls for 400g of water in a loaf, I always start with 325 or 350 and work up from there. You can always add more water to a formula at the dough makeup stage, or salt stage, but you can't remove it. Speaking of, the salt stage is actually a great place to think about additional water because it helps disperse the salt, and the dough has relaxed enough so that you can really feel if it needs to be further hydrated. I think the biggest mistake people make is adding too much water early on. The dough is a far different creature at dough makeup stage than after the autolyse. It may seem stiff at first, but autolyse really relaxes the dough and gives you a true snapshot of the hydration of it. For instance, in my aged flour and original Michettes, I used 350g of water, but in the Michette where I milled the flour and used it straight away, I needed 369g. And I am making yet another Michette as we speak using flour that I milled and sifted only 15 minutes prior to making the dough, I started with 369g of water, but added another 20g at salt stage because the dough was a little too elastic for my taste. Be flexible when it comes to hydration!
About bolting your flour: The old-school way of making 'high-extraction' flour.
Your flour will mill up from your grains gram for gram. So, for the 206g of home-milled flour, you will need 206g of grains. But for the bolted flour, you will need about 60% more whole grains than called. To bolt, you simply need to grind the grains on a wee bit coarser setting than you would your flour. Set a drum fitted with a fine-mesh screen (I used a #50 here) over a bowl large enough to hold the drum. Now using your hand, swiftly sweep it back and forth and in circular motion over the flour, applying some pressure to encourage it through the mesh. The fine flour will fall into the bowl. Keep going until you can no longer coax any flour from the chaff. After bolting, you will arrive at 42% - 47% of flour, what remains is this gorgeous 'chaff' that you can use later to dust your loaves with.

freshly milled

sifting screens

winnowing

bolted flour

chaff
Back to the formula.
When your levain is properly fermented, dissolve it in the water and mix it together with the flours and the h2o until you reach a shaggy mass. It will look like this.

Autolyse for two hours. After the autolyse, squish the salt into the dough until it's fully incorporated work the dough into a smooth mass. Now it's time for the 4-hour bulk fermentation. Here you will perform a series of turns every half-hour throughout the entire bulk fermentation, taking care not to deflate the dough as you near the end of bulk. If the dough puffs up and you find it too difficult to perform the turns without deflating the dough, then you can let it finish its fermentation untouched. It will be fine.
When bulk fermentation is accomplished, turn the dough out onto a workspace dusted with some of the 'chaff' that you saved from bolting your flour.

Shape into a loose round. Let it rest. Drape with a damp paper towel to keep it from forming a skin. Mine rested for 10 minutes.

After the bench, shape the dough into a taut boule and pop into a banneton or a bowl lined with linen that you have dusted with your leftover chaff.
Pop in the fridge and ferment. Mine fermented for 11 hours.
BAKE DAY

Preheat the oven to 500 with a dutch oven and baking stone inside.
Unearth the dough by placing a sheet of parchment over the mouth of the dough bowl, then place a peel over this and quickly invert the bowl so that the dough ends up sitting on the paper and the peel, seam side down.
Slash or snip the thing in some divine manner, then slide it into the shallow half of the hot dutchie. Cover with the fat half, slide it into the oven, and steam for 15 minutes at this temp, then turn the oven down to 475 and steam for another 15 minutes.


After the steam, remove the fat end of the dutchie, then stack the pan over its mouth to create a buffer between the hot stone and the bread. This will help keep the bottom of your bread from blackening.
Toggle the oven between 460 and 475 until the boule is baked to desired darkness. With white wheat, a golden blush is lovely. I bake mine to an internal temp of 210 degrees.
Cool on a wire rack for at least an hour before slicing.
MIGNON MICHETTE


.
.
Michette - 10 hour Final Fermentation, Fresh-Milled Flour, 389g water at dough makeup:


To the staff of life!
Great post. Beautiful bread and perfect crust and crumb. I have never aged my flour like you have suggested and have had no issues with flat loaves, but I will have to experiment myself and see if it really makes a difference.
ReplyDeletethank you Mookie! i don't mind a little flatness. it makes it more of a michette!
DeleteHi there,
ReplyDeletehey, you are back? Really nice stuff! Just ordered Chad's book on whole grain bread to see how he is doing it :-)
See you
Bernd
Indeed, and excellent!
DeleteFunny...I always mill my flour the same day I use it and have never had the issues you describe in your post regarding "green flour." Something to consider: the oils in the germ start to go rancid within hours of milling unless it's put in the freezer. The oils will be fully oxidized within 2 months of milling. The milling process exposes the oils to oxygen. I also find the flavor to be much better in fresh flour than in older flours that have been left at RT.
ReplyDeleteIf you mill it within a few hours of using, you will not be affected by the green flour issues. So, milling and using within 8 hours, it has no negative effect.
Delete